


Howdy! I still haven’t heard from two of the winners of the HomeGoods cards -- Cammy and Stephanie, holla at me!
So, remember when I showed you the start of our bedroom redo a couple of months ago? Remember the purple drapes?:

Oh my. They were looking pretty sad.
They were left over from the room before…and before. :) But obviously it was time for them to go. Then one of my lovely readers, Missy, told me about some drapes online at JCPenney – they were beautiful, they were the rust color I wanted, they had long lengths, they were reversible, aaaand they were only $12.99 each!
Ding! Ding! Ding! SCORE.
I was sold! I love the look of really full drapes, so I got the 95” length and got four panels. I was thrilled when I got them and they were the perfect color! I showed you the drapes in this post, when I was trying to figure out the area above the bed:
Yes, I think I know what I’m doing now…but no I’m not ready to show it just yet. :) Evil, I know. :)
So anyhoo, I knew the plain rust side was a bit much, so I was planning to add a touch of cream to pull in the colors from the new bedding. My original thought was to trim them out with a thick band of grosgrain ribbon. Or maybe even use cream fabric paint.
But that’s a LOT of ribbon for four 95” panels. And the paint idea just sounded like a headache waiting to happen. (Taping off straight lines for miles – thanks but no thanks.)
I mentioned the drapes are reversible – the back side was a beautiful buffalo check print. When I hung the drapes the night we got them, I held up the check side and hubs and I both though they may read a bit too country for our taste.
But the other day I turned them around, just to see…and oh. my. I was in LURVE. I also left the rust side on the other end of the window for a good week, just to make sure my love was real.
It was. I was hooked on the check. :)
(I showed you a peek last week in my “Mom Cave” post.)
It’s slightly shimmery, it’s got the dark rust, a lighter rust, and it’s got the cream I was looking for all this time. AND it was there in front of us all along. I love when it works out for FREE.
When it comes to hanging my drapes, there’s a few things I do that I get asked about a lot -- the first is what I do to make them look pleated. I learned this little trick from a fellow decorator I used to work with…and it right up there with the top three window treatment tips ever. (In my itty bitty opinion.)
It’s good peeps. Really good. :)
Custom made drapes (or any nice treatments) are made with drapery hooks – and the hooks are used to hang them. They give the fabric a full, pleated, custom look when hung and look like this:

I’ve made all of the treatments in our home, (up till now!). I rarely sew them (I’m a hemming tape and iron kind of girl) and when I do sew I can barely do a straight line -- so doing something like the hooks is way over my head. I tried it once and let’s just say it just didn’t go well…at all. :)
The little trick I learned doesn’t need these dodads -- all you need are your rings with hooks. Instead of clipping your drapery rings to the top of the window treatment, or putting the rod through the top of the drapes…pull your fabric up, pinch it in sections and clip the back of the fabric from behind:

Like so:

You’ll notice I used two different types of rings – half of them were $1.99 at the thrift store, but I needed more to get the full look I was going for. They didn’t have to match cause you can’t even see them!
See? Tricky tricky! ;)
I like to clip each side of the treatment, then the middle, then do the rest in (fairly) equal sections:

The end result really depends on the fabric – this fabric is perfect! It’s just stiff enough to keep the pleats standing up, even though I have them clipped a good five inches down from the top.
Every once and a while (like every six months) I need to poof them up, but otherwise it works GREAT:

If you have a thinner fabric, you can still do this, but you’ll have to clip much higher on the fabric. Does that make sense? Otherwise you’ll have floppy pleats. And no one likes floppy pleats. :)
The result is a very custom look, without the custom price (or work!):

I do this with ALL of our drapes and absolutely love the look!
My second little trick is my short rods. I get a lot of questions on where to buy the short rods I use.
Well…you can’t. At least I haven’t found them -- that’s why I DIY my own. :)
Most of our drapes aren’t operational – we don’t close them for privacy because we have the roman shades. Because of that, I prefer not to use a long rod across the window. It’s just a personal thing – I don’t mind the look at all, but it can get costly to get a rod long enough to go the width of a double window.
So I just cut them myself – if it’s a wood rod, like in our family room:

I just use my miter box or saw to cut a long rod down to the size I want:

Then use a drill bit to add a new hole at the ends for the finials. That’s it!
I love doing this because it makes your drapes seem fuller than they are, and you can use a cheaper rod (maybe four feet?) and cut that down, instead of a huge six or eight foot one.
For metal rods, I use a tool you can find in the plumbing department:


I think it’s about $8? You just put the pole in, tighten, and turn it so the tool can cut it. It takes a few minutes, but it’s easy!
Of course, you’ll need two sets of finials and brackets, so sometimes that can override the whole saving money on the rod thing. ;)
(Drats.)
Have I mentioned I LOVE my new-but-not-really drapes?:

You’ll notice in the pics above that the window is really close to the wall to the left…it seems the architects don’t consider our window treatments when building our homes! How could they NOT? Helloooo…it’s right up there with support beams and insulation and all the important stuff!
When I have a window that butts up against a wall like that, I just skip the finial. I didn’t use them at all in the Bub’s room:

I promise no one will notice. And if they do, give them a cookie. :)
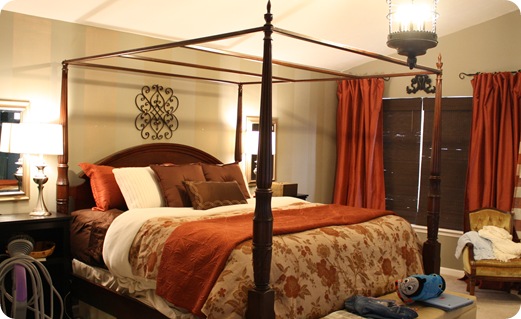
So here’s one more shot (are you tired of seeing this spot yet?!) with our buffalo check drapes, DIY rods and pleats:

And the kitty was trying to get in every. single. shot. So here you go:

:)
JCPenney’s still has the drapes for sale! Even the 108” length is only $12.99 a panel. That’s crazy good! I could not even begin to make reversible, lined drapes that length for that amount. LURVE!!
The only color left is the terra cotta color, except in the longest length, and they have a bronze/pearl combo as well in that one. That color looks lovely as well. Check them out here!
I don’t think they look country at all now – just traditional. And loverly. Me likey.
P.S. Are you singing this in your head yet?
That’s right on time it’s trickaaaaaaaaaay…
I love the 90’s.
